Hi guys, how do you add 2 buttons ‘Approve’ & ‘Reject’ to the email Template. Please can you also add a screenshot of the coding with your illustration. Thanks
Hi,
I don't think Pipefy has these approval options via email templates.
Hi. Unfortunately this feature doesn't available, but it's a good idea. But there automations based on receiving emails that could help you.
Try on!
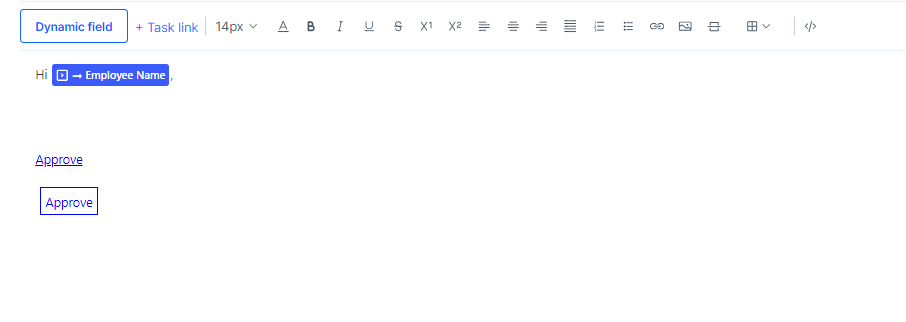
It is possible, since Pipefy allows to write custom HTML in your E-Mail template. I suggest the following procedure: use the visual editor to edit your E-Mail until everything looks good (except for the missing buttons). In particular, add two links, one with content “Approve” and one with content “Reject” (linked to wherever you want that something happens).
Then, you use the rightmost button in the editor’s toolbar:

There, you will then have to find the two links you added. These will look something like this:
<a href="https://your-link-target">Approve</a>you should now edit this code to include a style attribute with the CSS styles needed to make it look like a button. For example, you could use the following:
<a href="https://your-link-target" style="padding: 5px; border: 1px solid blue; margin: 5px; text-decoration: none; color: blue; background-color: white;">Approve</a>to add a blue border and some spacing around the link to make it look like a button.
If you give me clear idea how you want the button to look like, I can give you the value of the style attribute you should use.
This user is eager to know how it works!
just your answer without wanting to offend or diminish people here in the community. Since I joined this community, you are the only one who always tries to degrade other members' responses as a way of showing yourself superior and on other occasions, you have treated me with disrespect. just your answer, simple
Dear
I am very sorry to have made this impression, it is not my intention to degrade anyone. You are a fellow community member I look up to, thanks to your incredible engagement and versatile knowledge. English is not my mother tongue, and sometimes I might write something too fast or copy it from Google translate without thinking through how it could affect others. I am very sorry if that leads to people being hurt, it is and was never my intention.
I am thankful for you to have pointed it out, I have edited my answer in the hopes that it is not hurtful or finger-pointing anymore. I would be thankful if you could point me to other instances where my formulation was not appropriate, such that I can adjust it there as well, or if you could give me suggestions for further adjustment of the answer above.
Hi
Thank you, much appreciated, it worked.

Want to be able to link this Radial Select Field to the buttons on the email. How do you link the buttons to the Automations? So if they approve it will move the card to the next phase and if they decline it will move the card left in the phases?
To link the buttons to the automations, it heavily depends on what type of automation you have.
The most general answer I can give you, assuming you don’t want to code: use something like Zapier, or Make (formally known as Integromat), and set up a webhook. This webhook should take a parameter, e.g. cardId. Then, as its body, the Zapier or Make automation should do whatever you want with the Pipefy card, given by the cardId parameter, until it can finally redirect the webhook user to the card, for example.
Then, you would edit your button/link to have the `href` (the link target) attribute set to the webhook-URL, with an additional “?cardId={{card.id}}” such that when users click on the link/button, they are taken to Zaper/Make, where your automation will run using the cardId to know which card to change, and then they are redirected wherever you want.
If you do not want to use Zapier/Make, there are some workarounds using Pipefy’s portal functionality, where you can also provide default arguments using the URL parameters and therewith automatically fill in the card in a separate process, which can then trigger the automation in the original pipe. The only drawback would be that the user still has to click a button to submit the Pipefy portal form. Depending on the E-Mail provider, this is not a bad idea, since some E-Mail services read and open links for analytic purposes, in which case your automations would be triggered, but not intentionally by the user.
These are very rough sketches of how to do it, please tell us if you decide on one of them and need more help.
An alternative I have not tried, but might work, is to use the “Task link” feature in the Pipefy E-Mail template, and then style these links. Not sure if it works though
Hi guys, tried this all weekend & with no luck, doesn’t anyone know the links to trigger a ‘Approve’ or ‘Reject’?
Hi
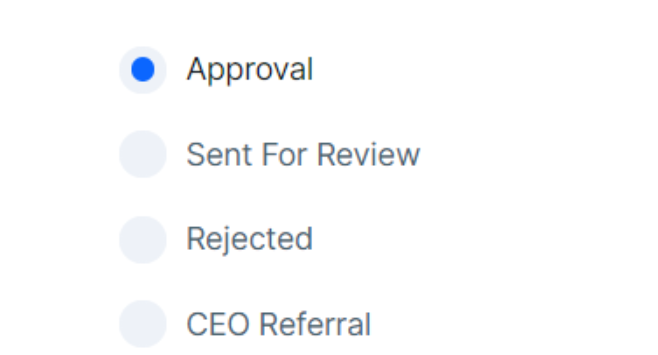
An “Approve” or “Reject” can be many things in Pipefy: a move of a card to a phase, creation of a child card in the case of approve, the tick of a checkbox, a selection of a radio or select field, it could be another E-Mail sent out, or even need a comment in a description field to argue why the decision is made.
Depending on that, your solution will be quite different. What is it in your process?
Hi
Ok.
Here therefore an explanation using Make.com:
Start with creating a Webhook trigger:
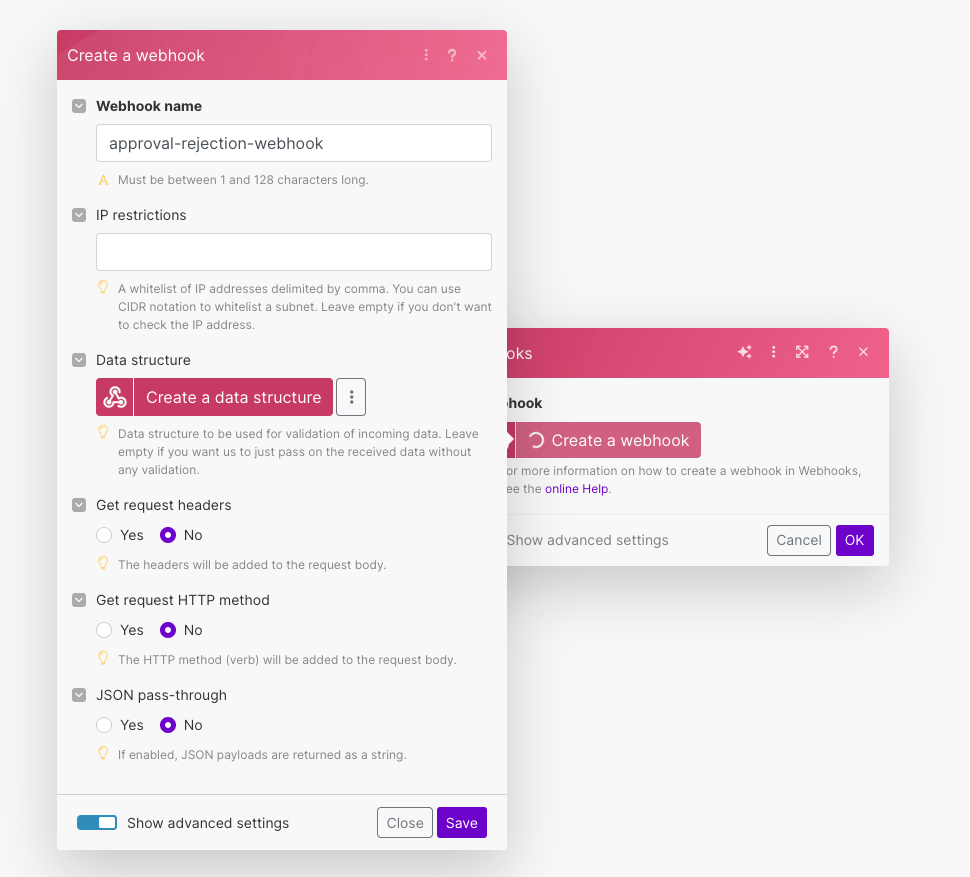
Copy the resulting address to the clipboard.
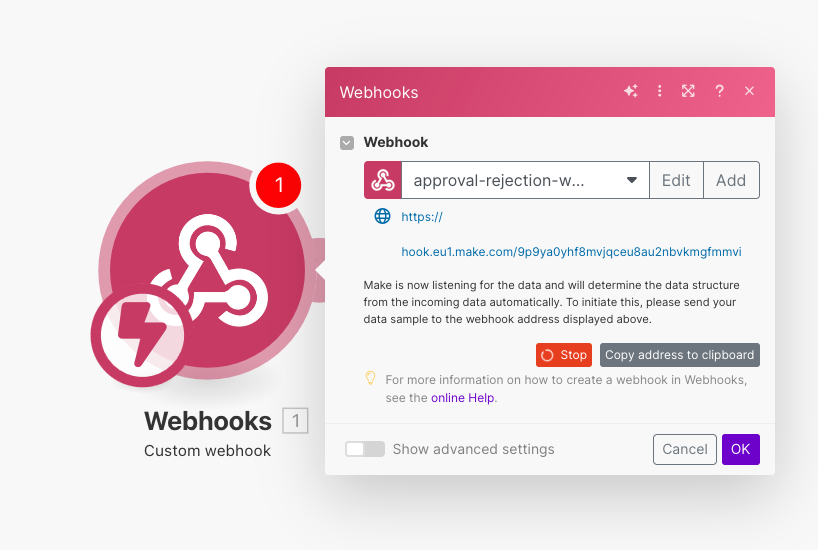
Open the webhook adress you copied, but append “?cardId=1234&appproval=Approved” to it before opening.
Now, Make knows the link you will be using for your “Reject” and “Accept” links and provide you with the required data (cardId, approval) in subsequent actions in Make.
For example, to update the field as requested:
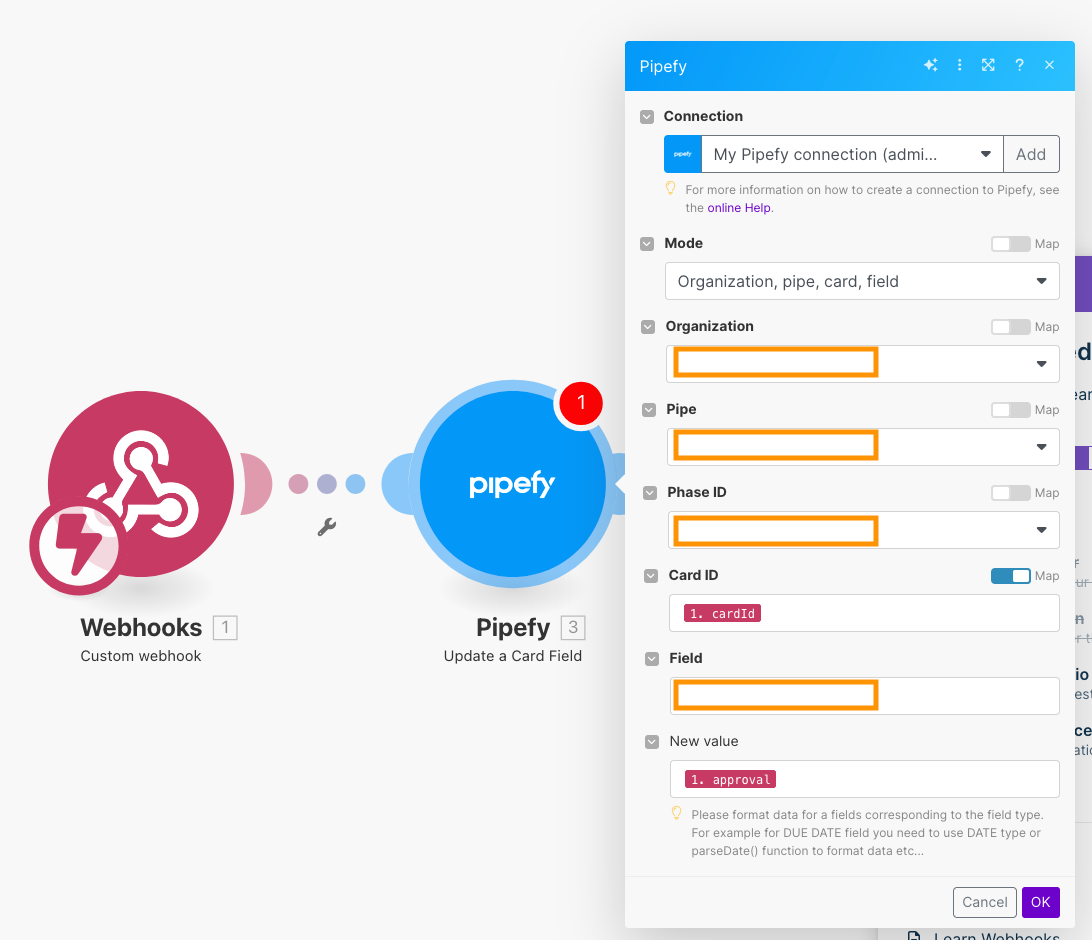
Make sure to replace the orange boxes with whatever applies to you. To figure out the name of the field, please check out this answer, for example (usually, the name of the field when it was first created, in lowercase, with underscores where e.g. spaces or special characters are).
Finally, you will want to redirect the user who clicked on the link somewhere.
For example by using the following action to redirect them to the Card in Pipefy:
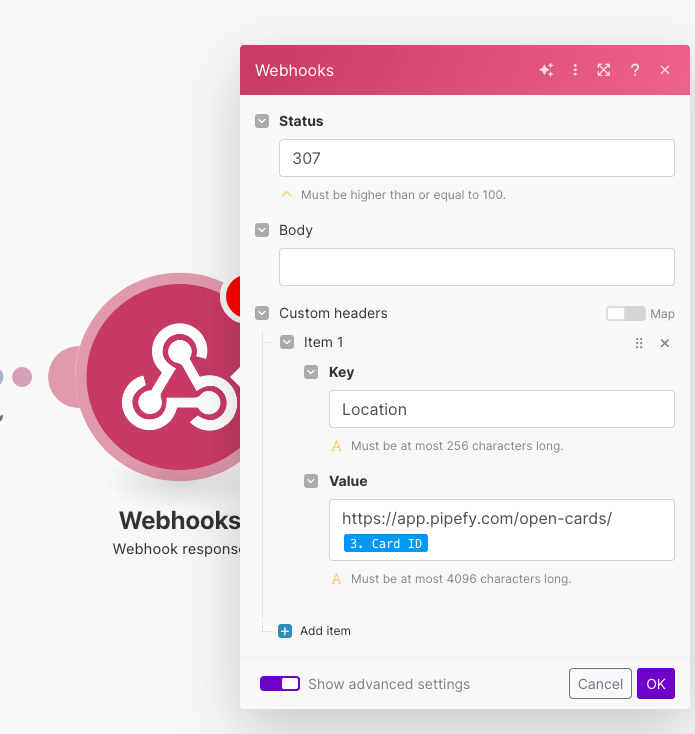
Now, all that’s left is to adjust the link in the template to be something like:
<a href="https://your-make-webhook-url?cardId={{card.id}}&approval=Approval">Approve</a>
<a href="https://your-make-webhook-url?cardId={{card.id}}&approval=Rejected">Reject</a>
I omited the styles etc. for brevity in these links; what you change is just the part in href=””.
Hi
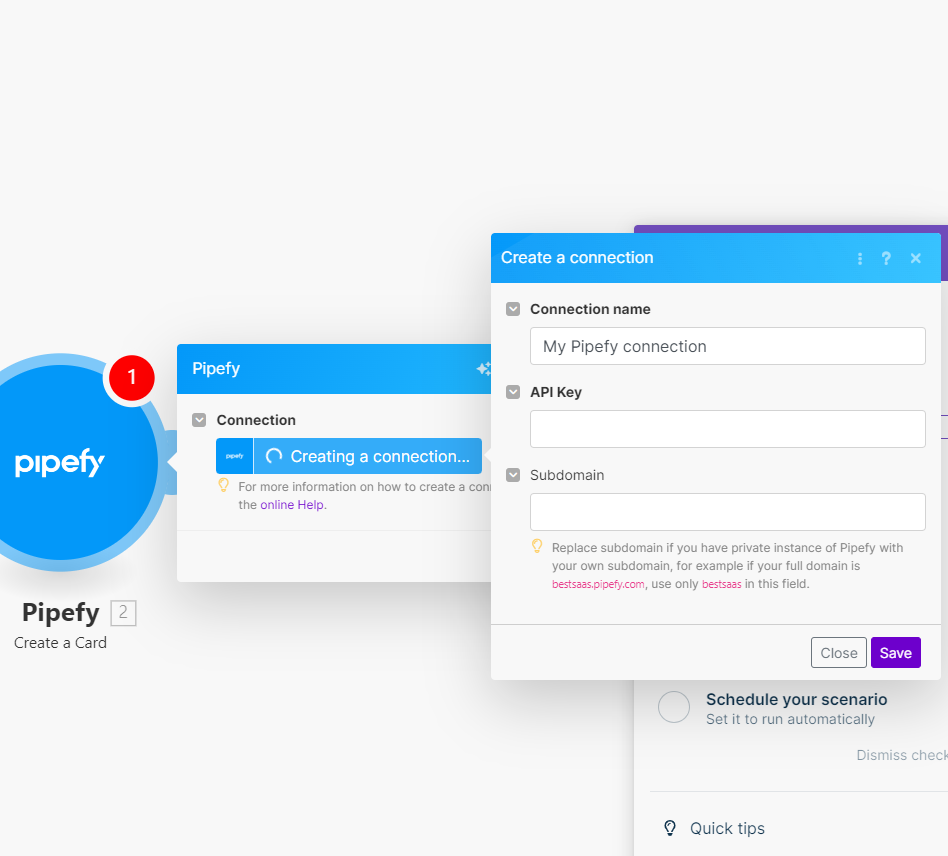
Its not giving me the same fields you had. What is the API key?
Hi
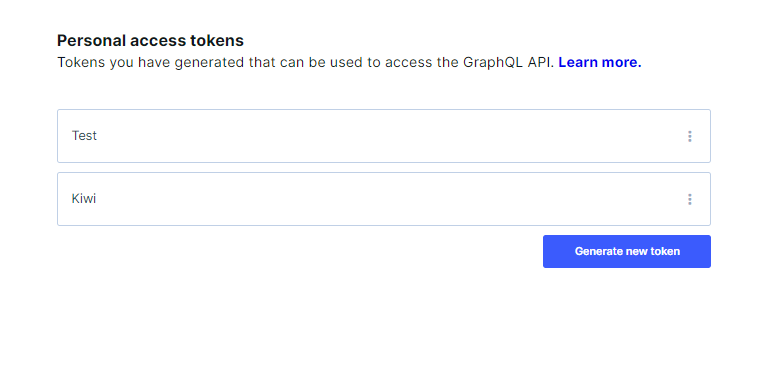
Thanks for coming back; Yes, your are right, that’s a step I jumped over because it is only required once and I apparently forgot about it, the creation of the Connection to Pipefy. What you enter here is your connection name (relevant if you have e.g. multiple companies connected with Pipefy) and the API key, which you get from Pipefy → Account Preferences → Personal Access Tokens, then click on “Generate a new token”. After copying that key from Pipefy to Make, click on “Save”, and from then on, you should have the same fields as I do. If not, please ask again.
Thanks

Hi
EDIT: I just checked, Pipefy has a confusing nomenclature regarding their API keys, my instructions were not quite correct as to where to get it from: it’s actually Account Preferences → Personal Access Tokens → Generate a new token, as seen here: https://www.make.com/en/help/app/pipefy
Hi
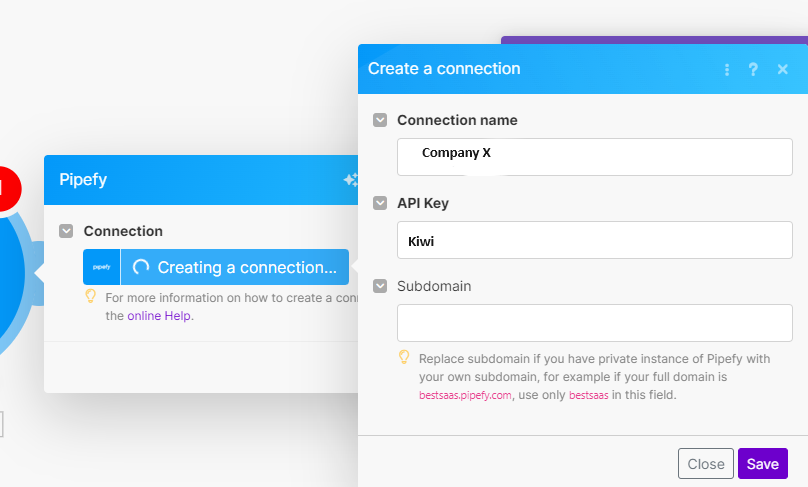
Pipefy Token:
By any chance, by selecting ‘Update a Card Field’ could that be the reason I’m failing to save and getting error message?
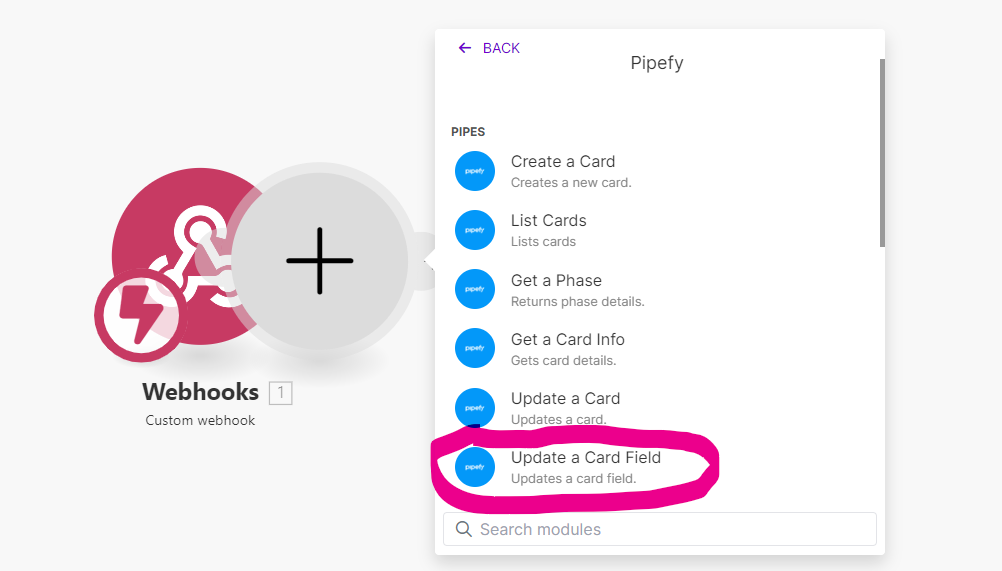
Hi @TMZ,
No worries, I am happy to help and sorry if it did not work out so far. Just to be clear: in the “API Key” field in Make, the content needs to be some awkward long text, which in effect is a password Make uses to authenticate with Pipefy (but noteably is one generated by Pipefy, do not enter your private account password of Pipefy in Make). This “token”, this long awkward text string, is generated by Pipefy. The name (“Kiwi”) is just for you, could also be e.g. “Make.com” such that you know, in Pipefy, which key is used for what, and could delete it when you do not use Make.com anymore, without it affecting e.g. Zapier, for which you would generate a separate key.
No matter which action you choose (“Update a card field”, “List cards”, etc.), Make first needs to authenticate with Pipefy, that’s what the “Connection” is for. No matter which action you choose, Make will always first ask you to create a connection to Pipefy, as long as you have none.
As I understand from your screenshots, you get an error because this connection to Pipefy fails – maybe you actually wrote “Kiwi” in the “API Key” field (though I guess not, that’s just you censoring it), or you are actually running Pipefy on a separate instance on your own subdomain, and would have to add that to the connection settings (the last field below the API key).
Hi
Hi

Hi
In your screenshot, I do not see well what you mean by functions.
You should be able to select “approval” like so:
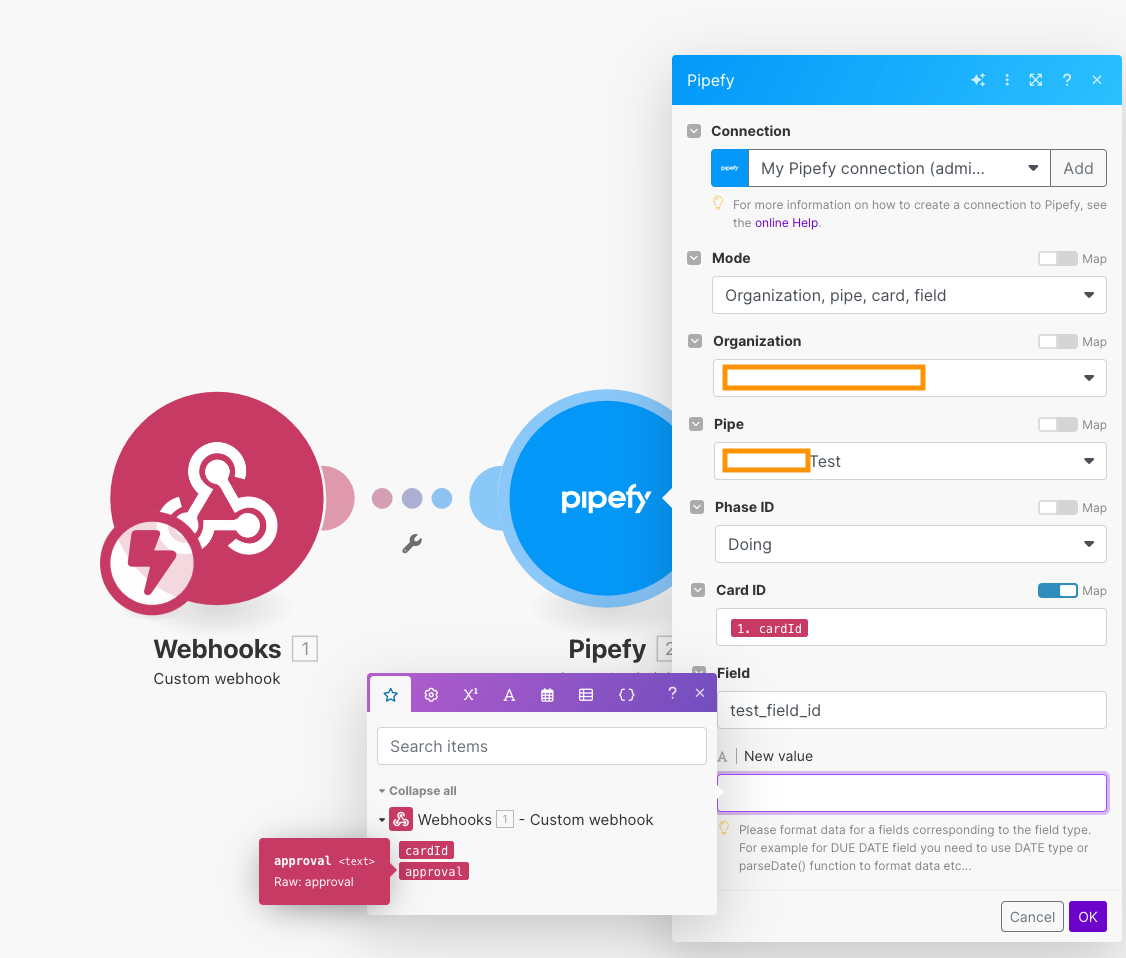
Hi
Open the webhook adress you copied, but append “?cardId=1234&appproval=Approved” to it before opening.
If not, you should now click on the first Webhooks trigger again, and then choose “Redetermine data structure” before doing this step – that’s how you tell Make that the Webhook will contain data, namely a “cardId” and an “approval” value. Then, these will be available as in my screenshots.
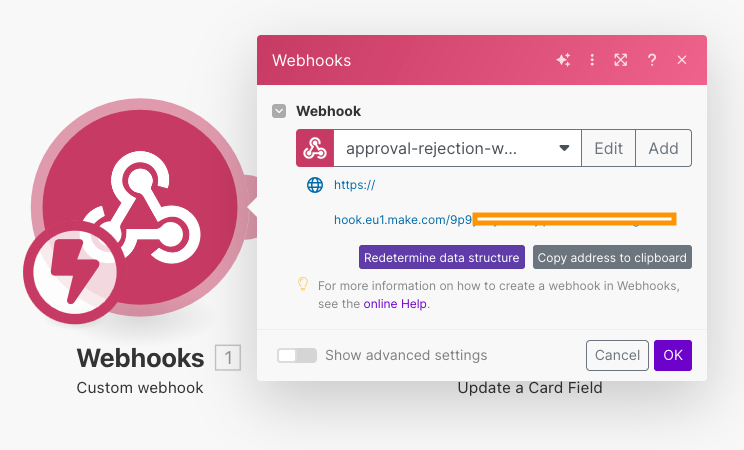
Reply
Join us in the Pipefy Community! 🚀
No account yet? Create an account
Login with your Pipefy credentials
Enter your E-mail address. We'll send you an e-mail with instructions to reset your password.

